Design Your Experiment
The following section provides step-by-step instructions for designing a Membrane Protein Workflow experiment.
The design of the experiment can be carried out on the Cloud Software or using the provided spreadsheet for the standalone system
- Cloud Connected
- Standalone
After registering your protein(s), you can move forward to design your experiment.
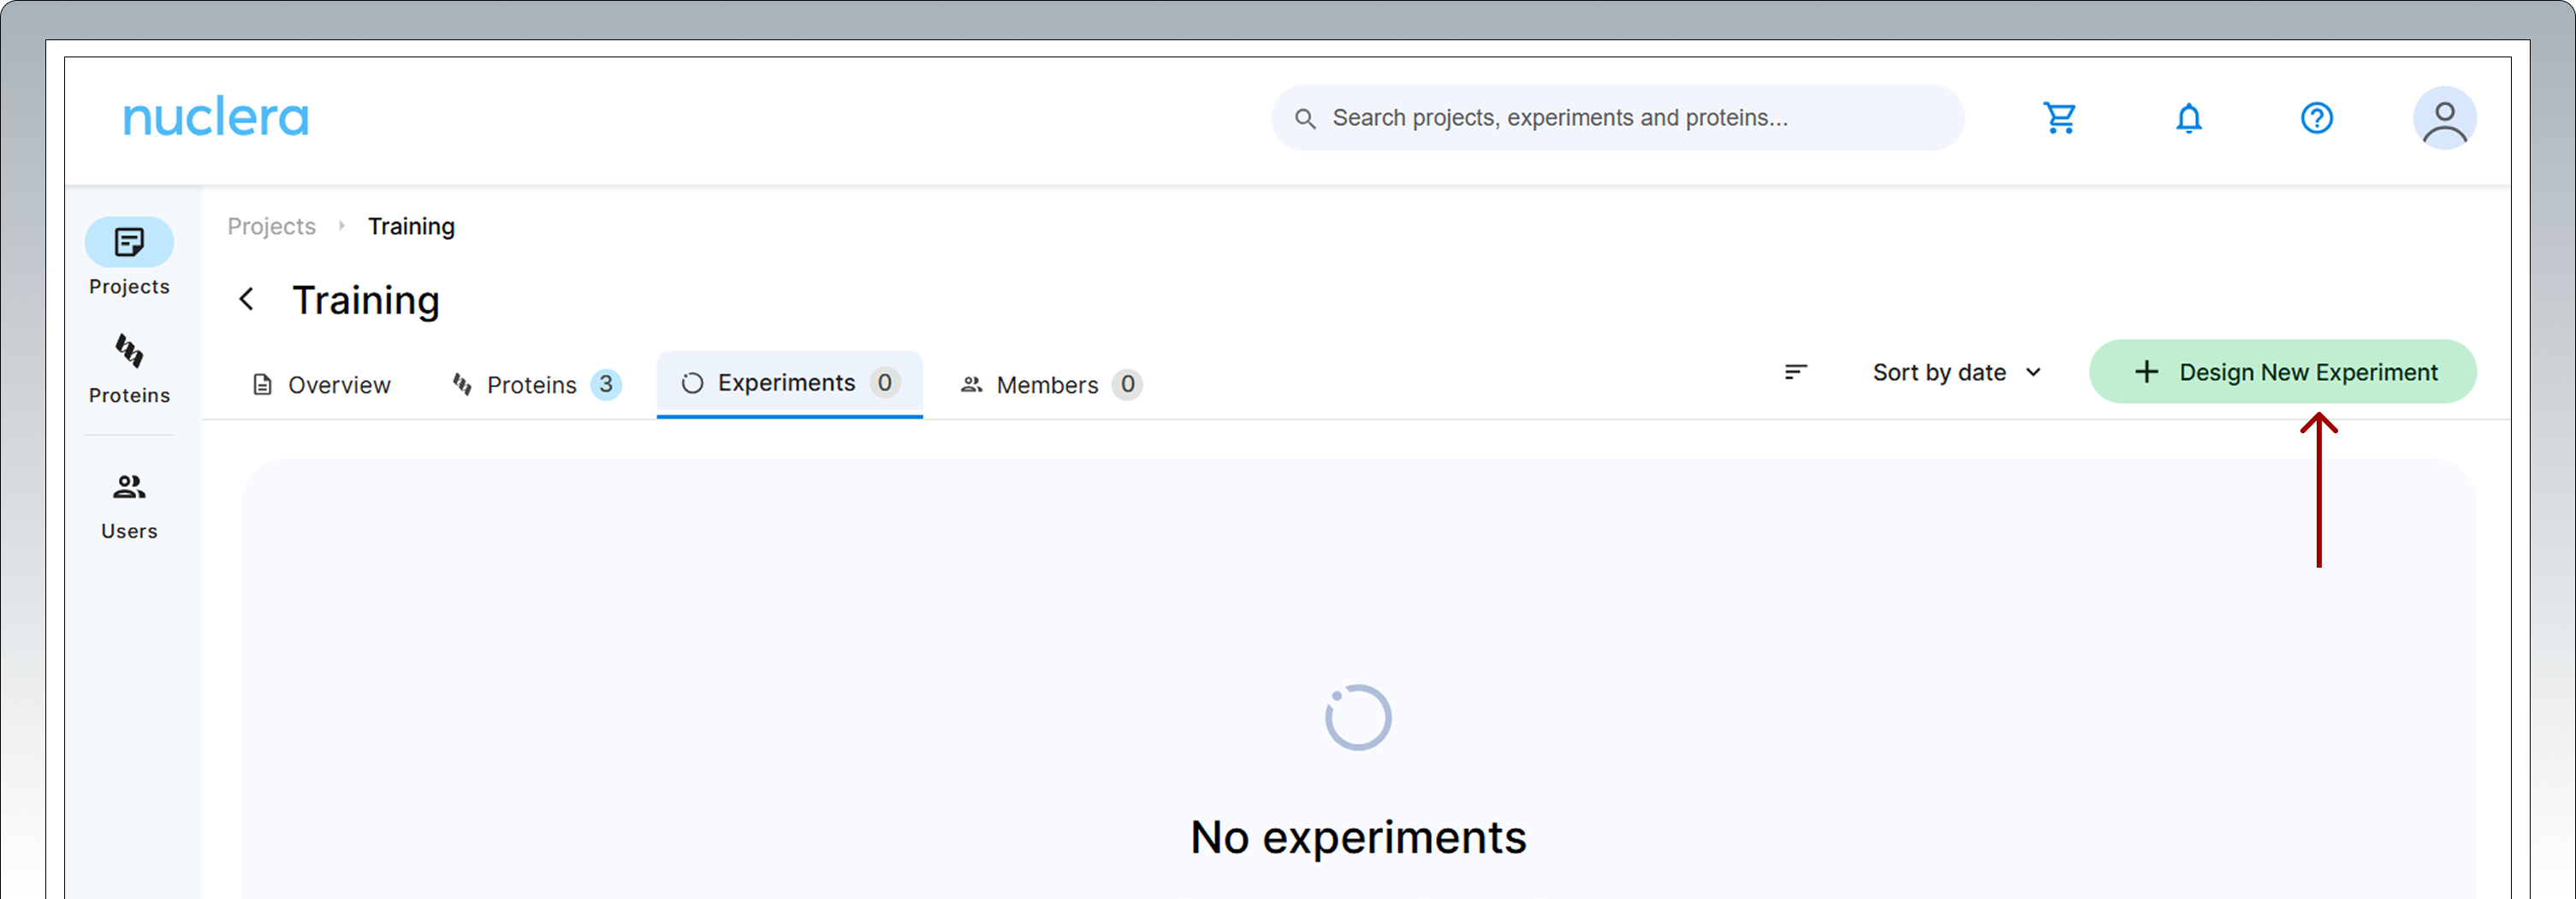
Create a new experiment Select the Experiments tab in your project folder and click on the [Design New Experiment] button.
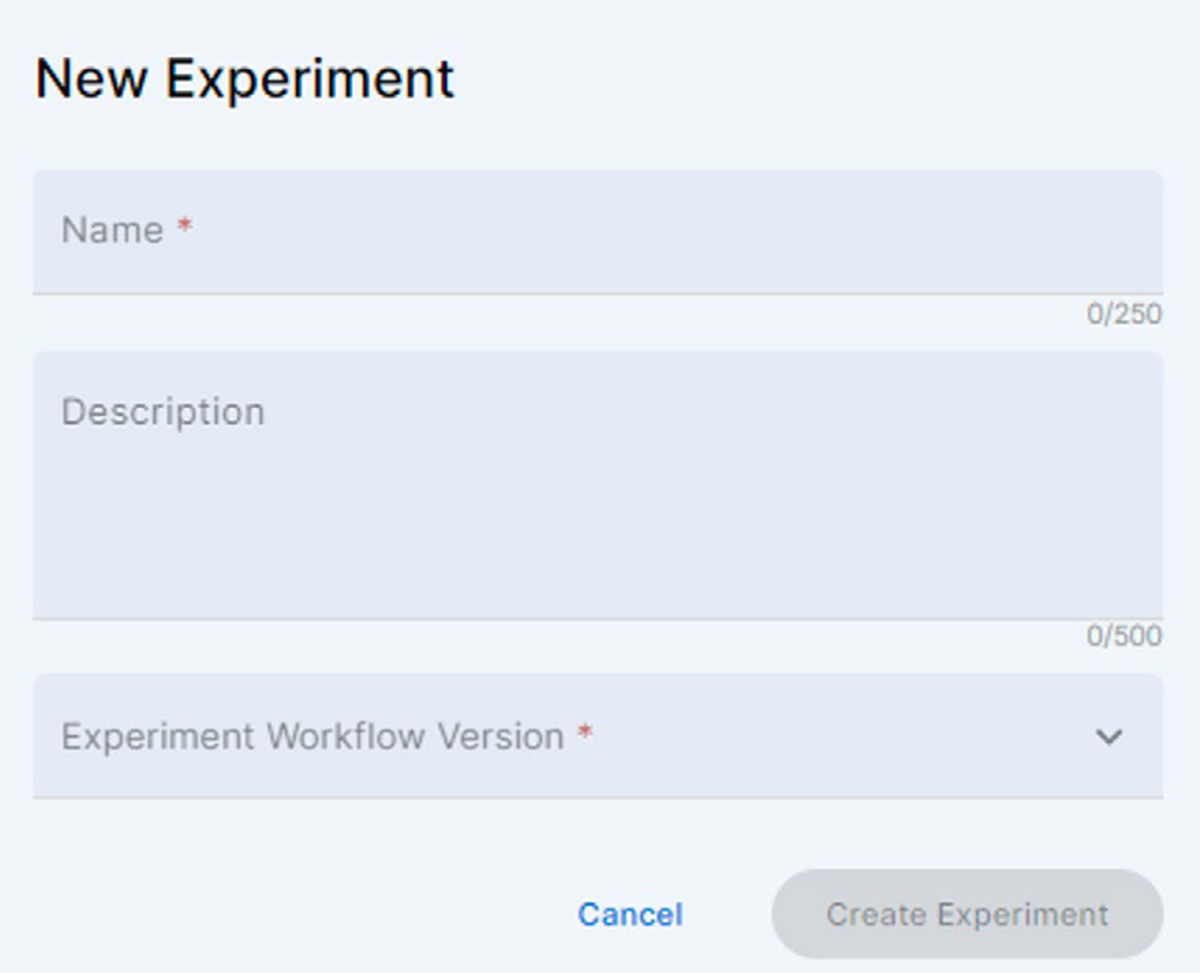
Enter the name of the new experiment, add a short text description and select the workflow for Membrane Protein Screen. Click the activated [Create Experiment] button
If the version of the Workflow is not compatible with the current version of the Instrument Software, a warning message is displayed, inviting the user to update the Instrument Software.
Note On the instrument, an incompatible experiment will appear with a warning sign inviting the user to update the Instrument software.
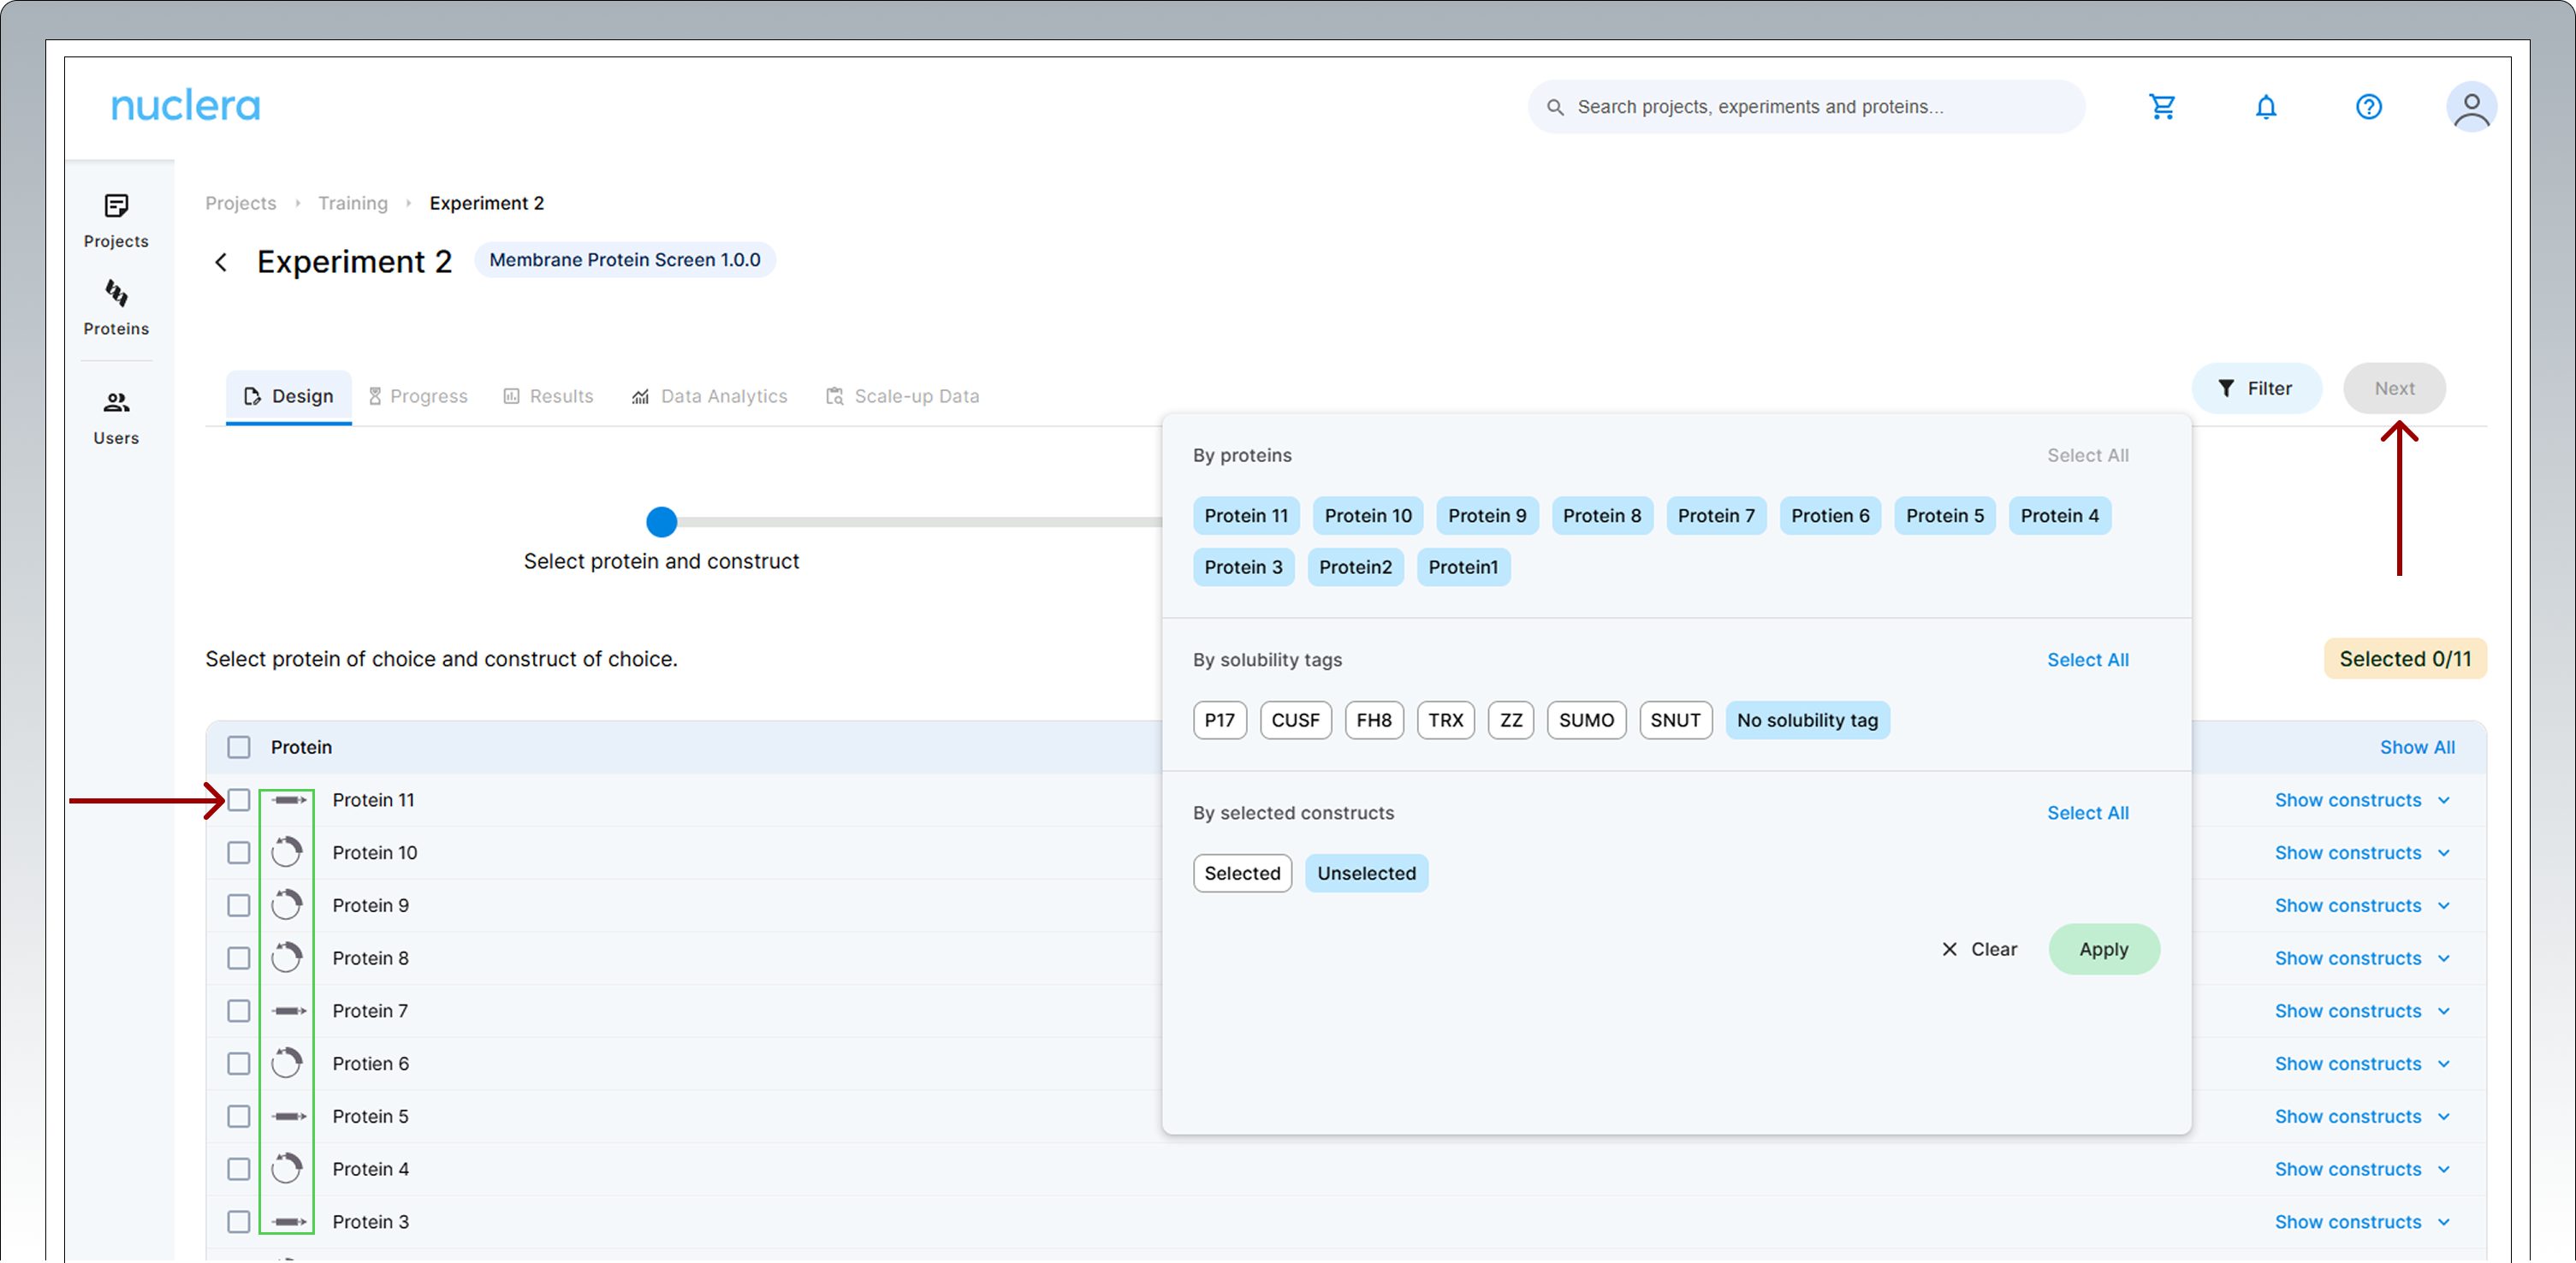
Select the eGene™ construct
Select 11 DNA constructs with no solubility tags to assign to a cartridge. For ease of selection, click "Filter". In the pop up window use the “By solubility tags ” section and click "No solubility tag".
The molecular form of your eGene™ constructs is shown next to the name of the protein chosen (green rectangle). Once a desired number of constructs are selected, click on [Next].
You can load the same construct (duplicate) in two ports if required by your experimental design.
Click [Next] to proceed.
Select the additives
Select expression conditions by adding two additives to the Cell-free Core Reagent. In the dropdown menu list the user will be able to find additives available in the Additives Screen kit (NC3013) and the eProtein Discovery GPCR nanodiscs (NC3023)
If you are in doubt on which additive to choose for your experiment you can refer to the ”Tailored cell free blend” section under “Technology Overview”. If you are undecided on the additive combinations to use, please reach out to Technical Support.
The eProtein Discovery™ system provides the flexibility to incorporate custom additives into expression and purification workflows, enabling users to tailor conditions for unique protein targets.
To ensure optimal performance and minimize risks, please consult the Chemical Compatibility List at https://info.nuclera.com/manual-custom-additives-chemical-compatibility-list.html, which provides detailed guidelines on compatible additives and their maximum allowed concentration. This resource serves as a valuable reference to help you achieve optimal results when working with custom additives.
Custom Additives can be shown in the experiment design by clicking on the [New custom additive] button. Up to 20 characters can be used for the definition of the custom additive.
An additive can be selected twice to enhance a specific condition.
The eProtein Discovery™ GPCR nanodiscs cannot be used as double additives as this negatively impacts the performance of droplet operations on the cartridge.

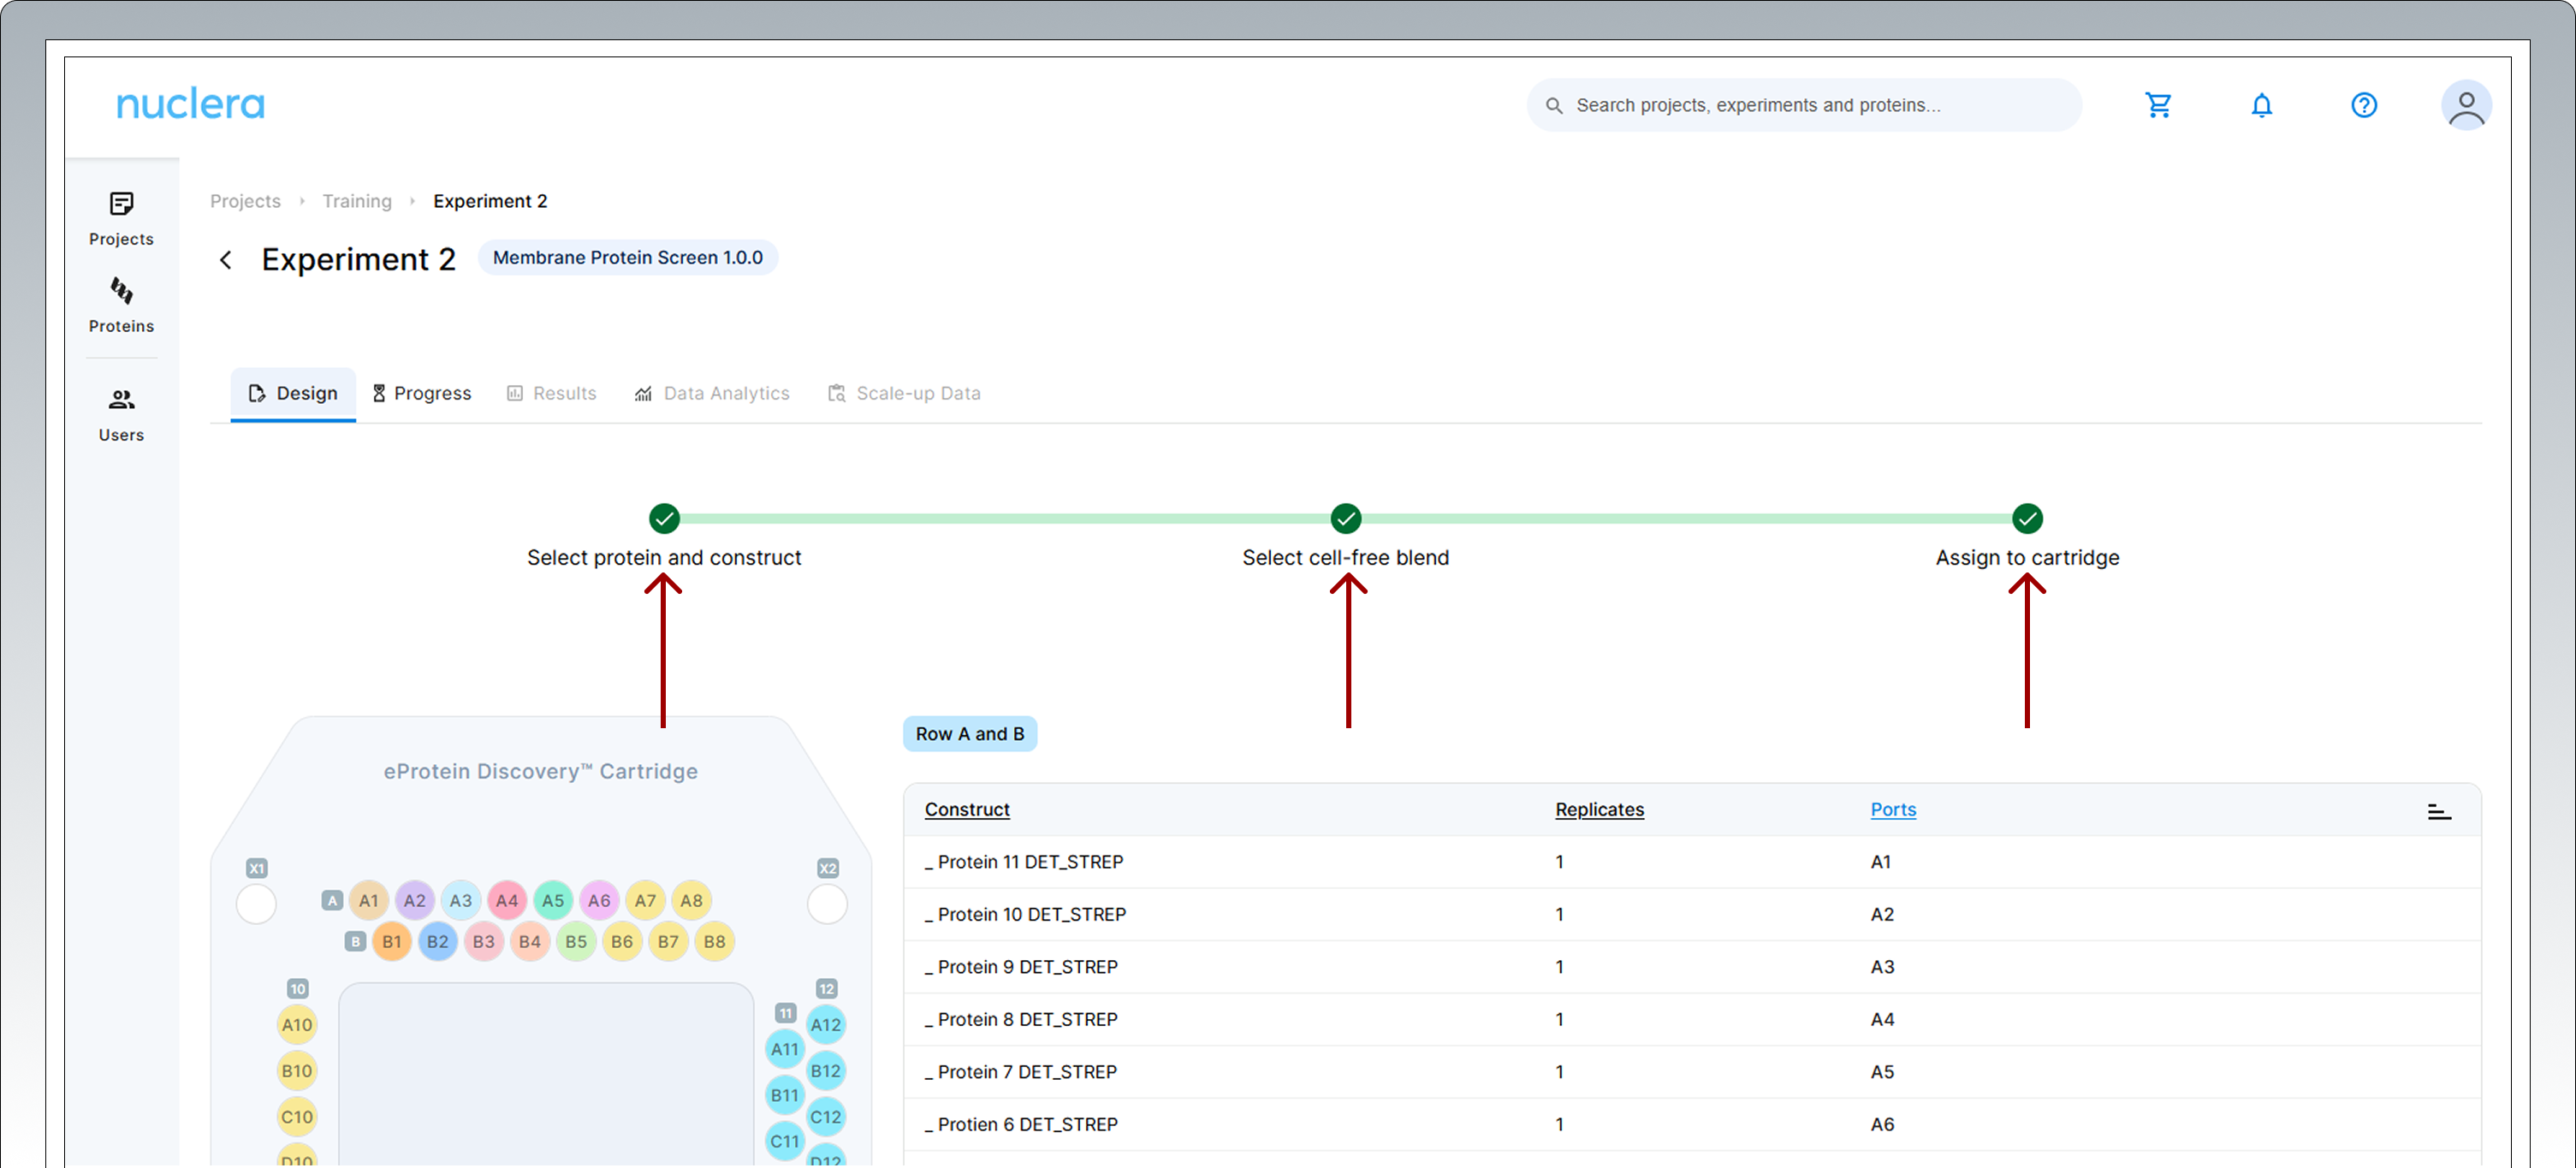
Assign reagents to specific ports
All samples and reagents are now assigned to a specific port on the cartridge.

Review & Correct sample allocation: In the final step you have the opportunity to inspect and potentially change port location for DNA samples and Cell-free Blends.
Drag & drop in the interactive cartridge map or use the drop down menu available on the right hand side to choose the location of each construct and cell free blend.
Press the [Next] button to proceed.

- Press the [Finalize] button to proceed. This will prompt to a checklist to make sure everything is ready for the experiment.
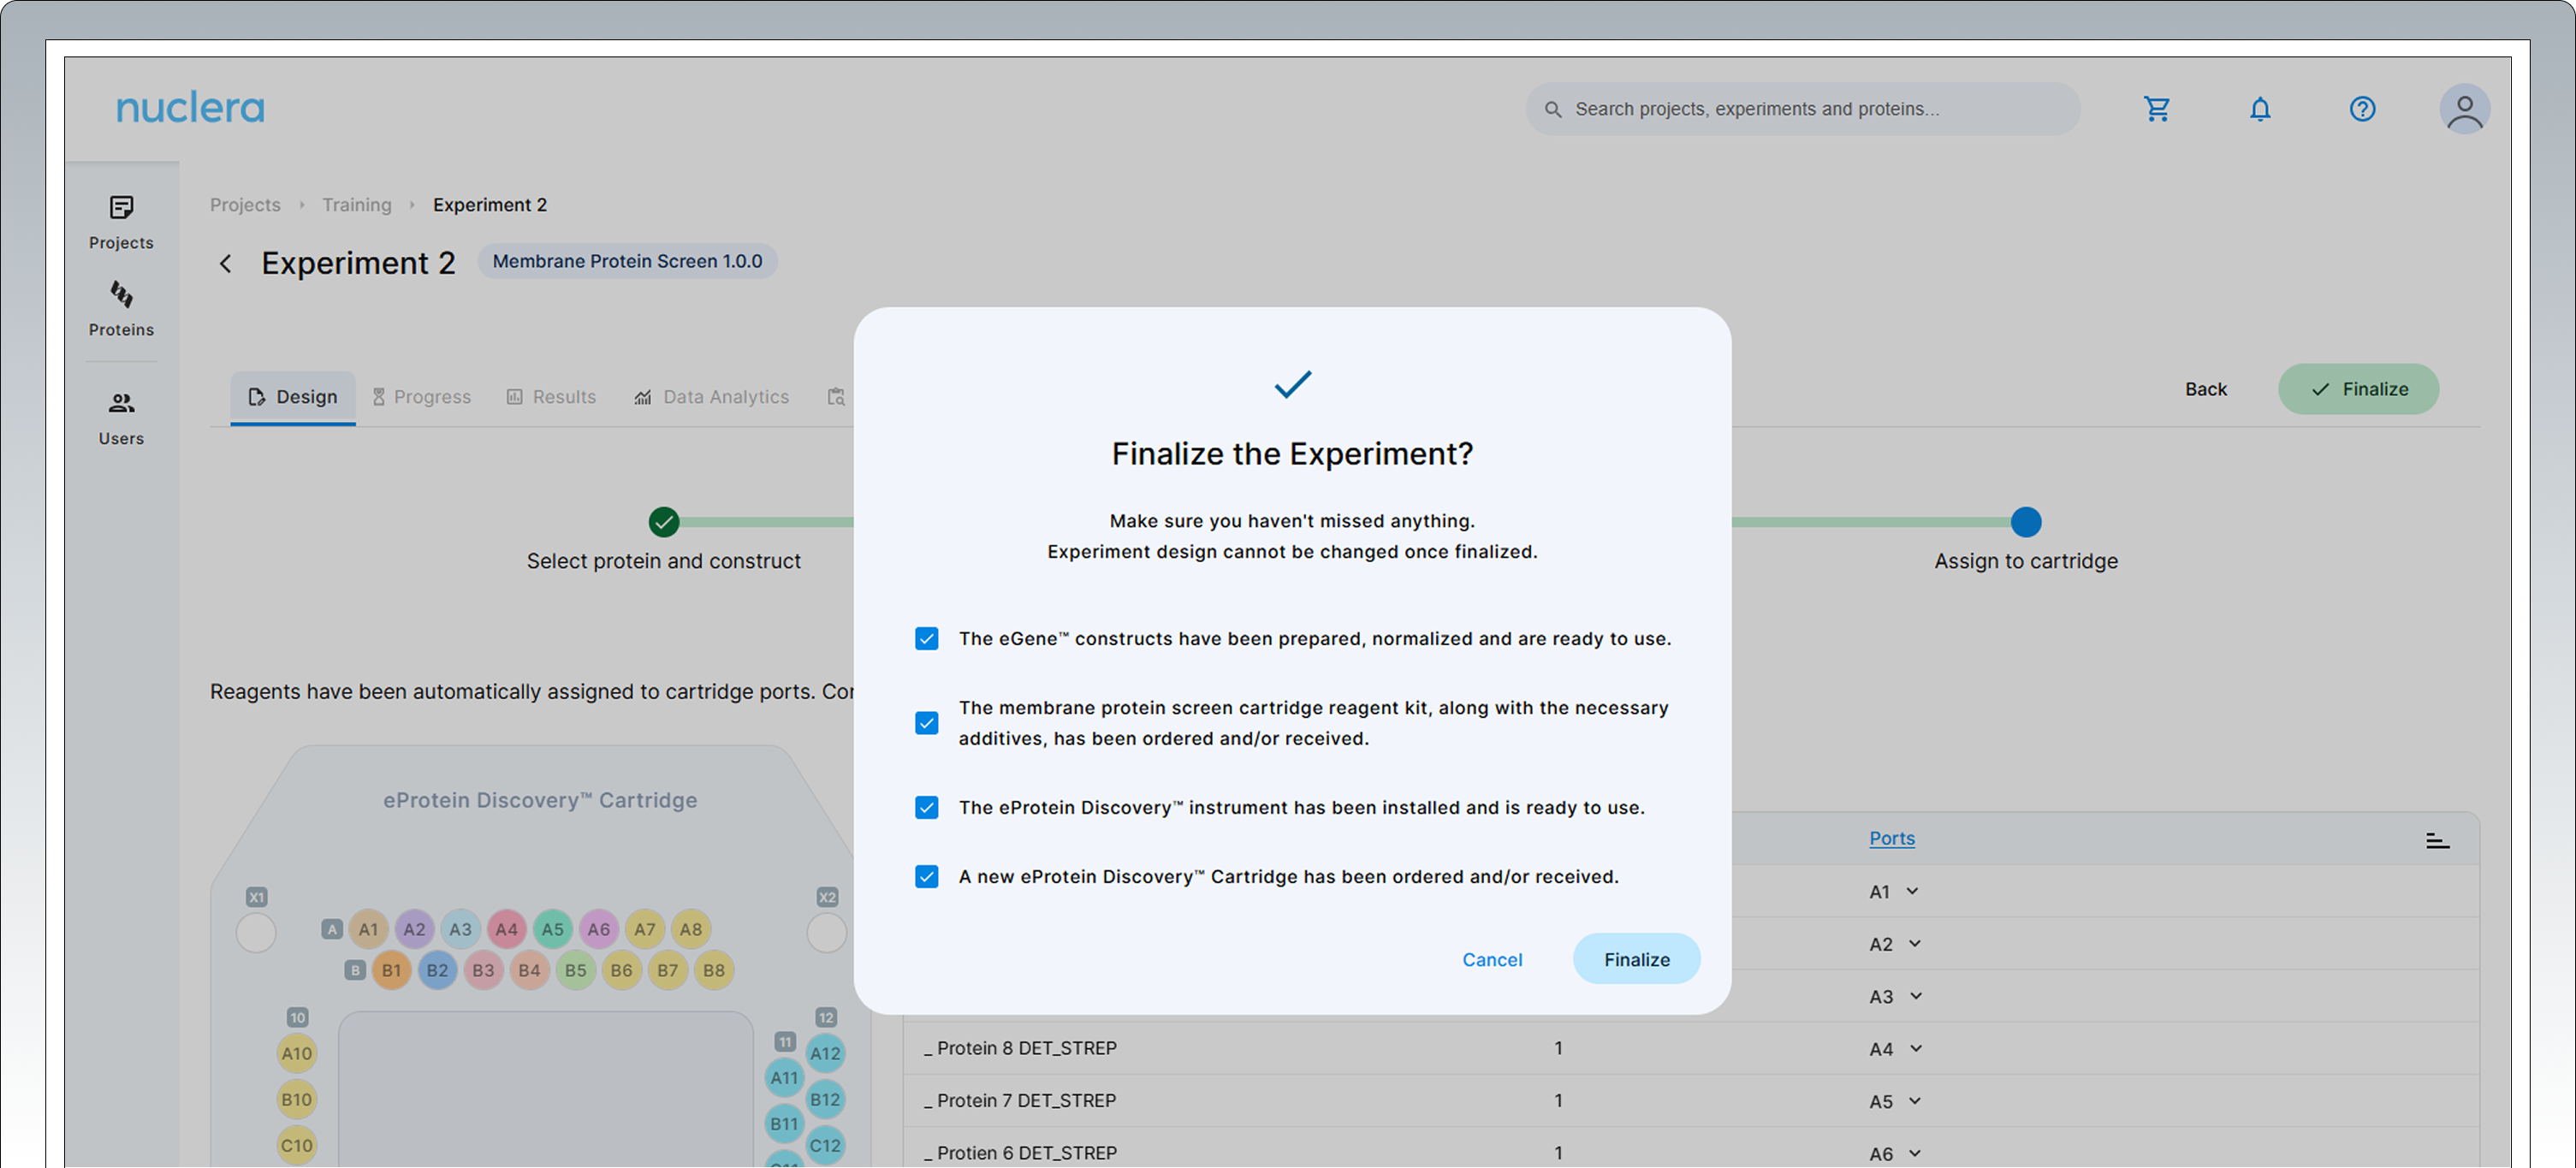
Once finalized, the experimental design cannot be changed.
Your experiment is now available on the instrument.
-
A summary of your experiment is now available. You can toggle and review the various aspects of your experiments by selecting the Design tab and clicking any of the three green circles in the design page.
-
You can download the "Transfer Plate Guide" by clicking on the icon on the top right hand side corner of the screen.
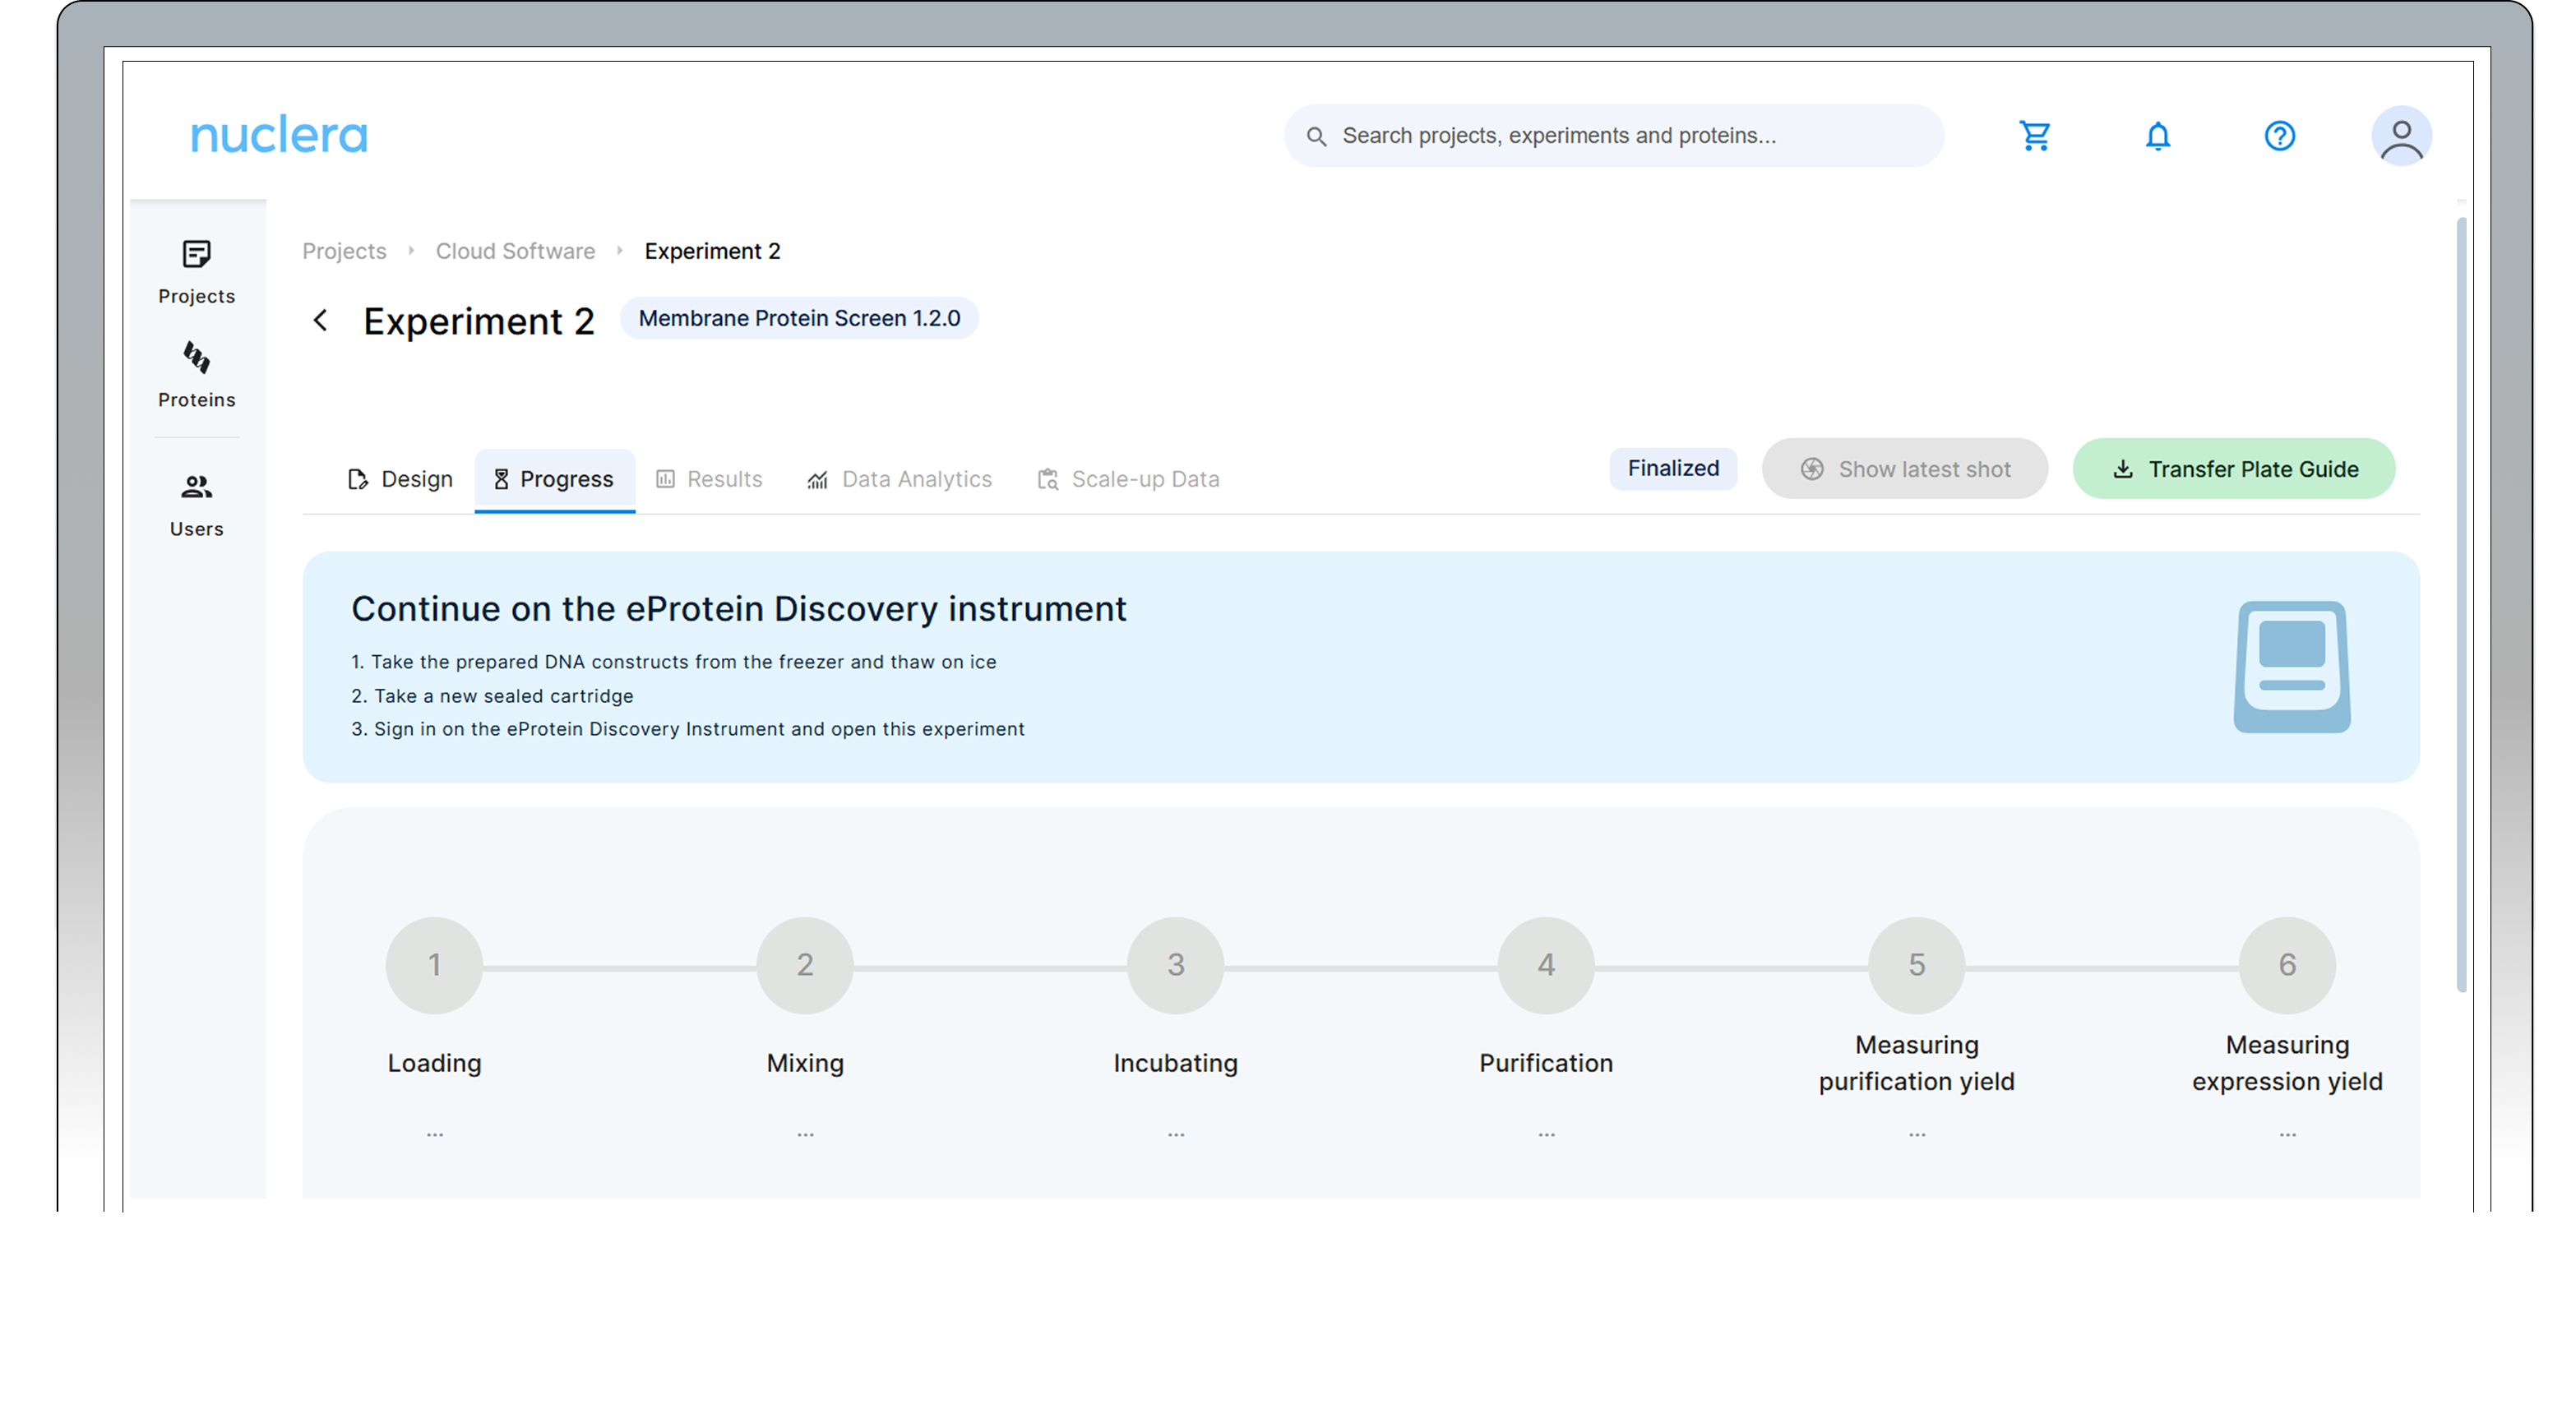 Preparing the transfer plate takes about 1 hour.
To design an experiment, use the Nuclera_eProtein_Discovery_Standalone_template (Excel file) available here, or on request by contacting the Nuclera Technical Support team (techsupport@nuclera.com).
The Nuclera eProtein Discovery™ Standalone template file is compatible with Microsoft Excel and it is not compatible with Google Sheet.
The excel template includes multiple worksheets. The worksheets provide step-by-step guide in designing the experiment and analyze data. Read the Template Guidance sheet before proceeding with experiment design.
Open the Excel file, enable editing, and save it under the name of your choice, for example the name or the date of the experiment.
"Template Guidance" sheet
This sheet contains a general introduction and guidance on how to use it. The first steps are to enable editing of the document and to save the file.
"1. Enter Experiment Details" sheet
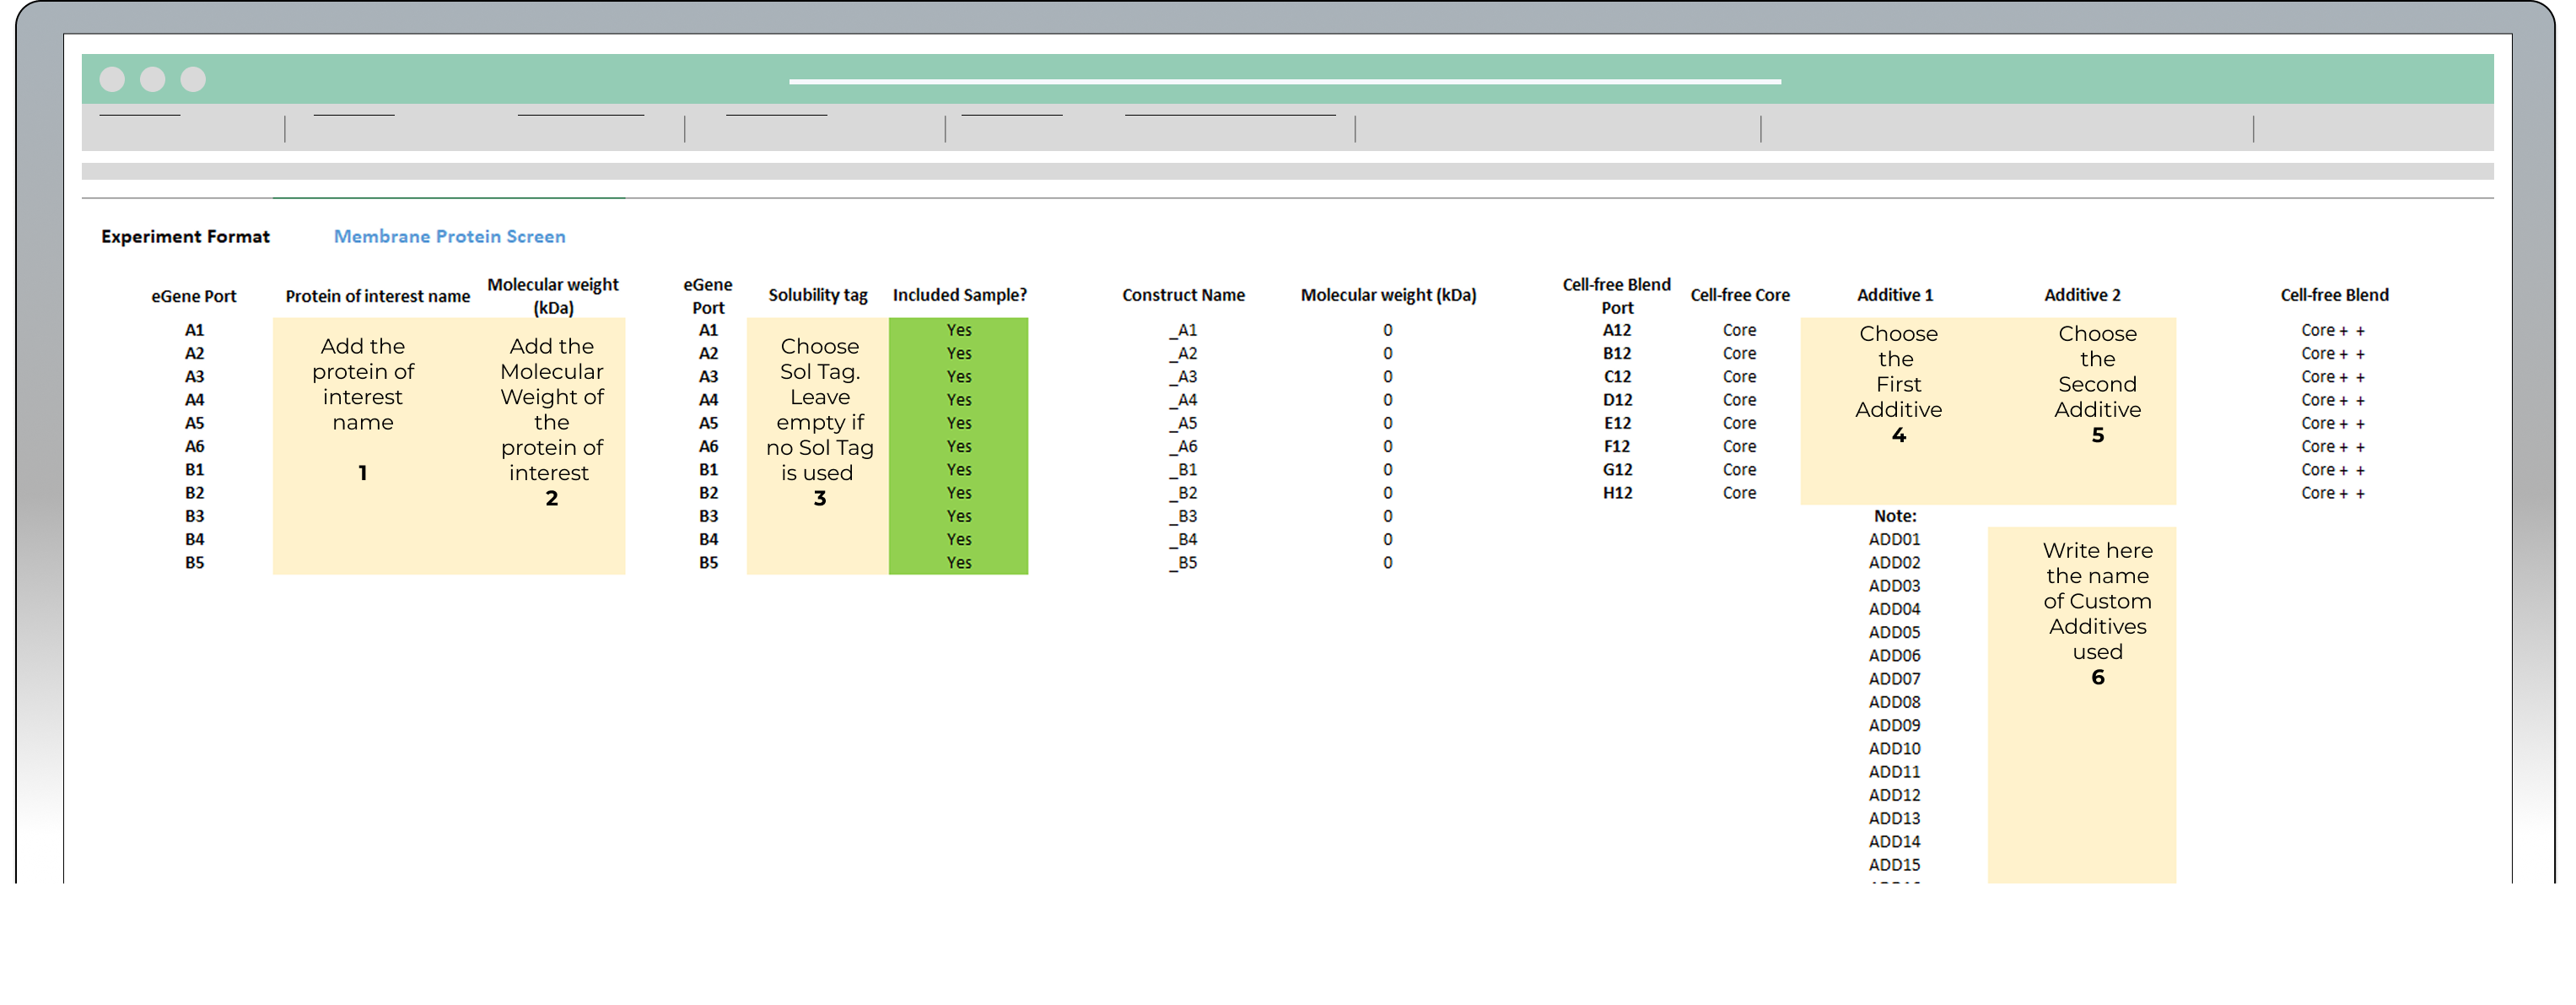
In this sheet you will design your experiment by adding the combinations of proteins of interest (POI), solubility tags and additives selected for the experiment. Enter the requested information in the cells highlighted in yellow (see image below)
- Enter the name of the proteins of interest
- Enter the molecular weights (kDa) for each protein of interest
- Select from the drop down menu the solubility tags chosen for the experiment. Leave Empty if no solubility tag is used (for membrane protein experiment No Tag is usually used)
- Select from the drop down menu the two additives required for your experiment
- If custom additives are used, it is possible to add them in the note. See point 6 in the figure below.
- Select expression conditions by adding two additives to the Cell-free Core Reagent. If you are in doubt on which additive to choose for your experiment you can refer to the “Tailored cell free blend” section under “Technology Overview”. If you are undecided on the additive combinations to use, please reach out to Technical Support.
The eProtein Discovery™ system provides the flexibility to incorporate custom additives into expression and purification workflows, enabling users to tailor conditions for unique protein targets.
To ensure optimal performance and minimize risks, please consult the Chemical Compatibility List at https://info.nuclera.com/manual-custom-additives-chemical-compatibility-list.html, which provides detailed guidelines on compatible additives and their maximum allowed concentration. This resource serves as a valuable reference to help you achieve optimal results when working with custom additives.
An additive can be selected twice to enhance a specific condition.
The eProtein Discovery™ discs cannot be used as double additives as this negatively impacts the performance of the droplet operations on the eProtein Discovery™ cartridge.
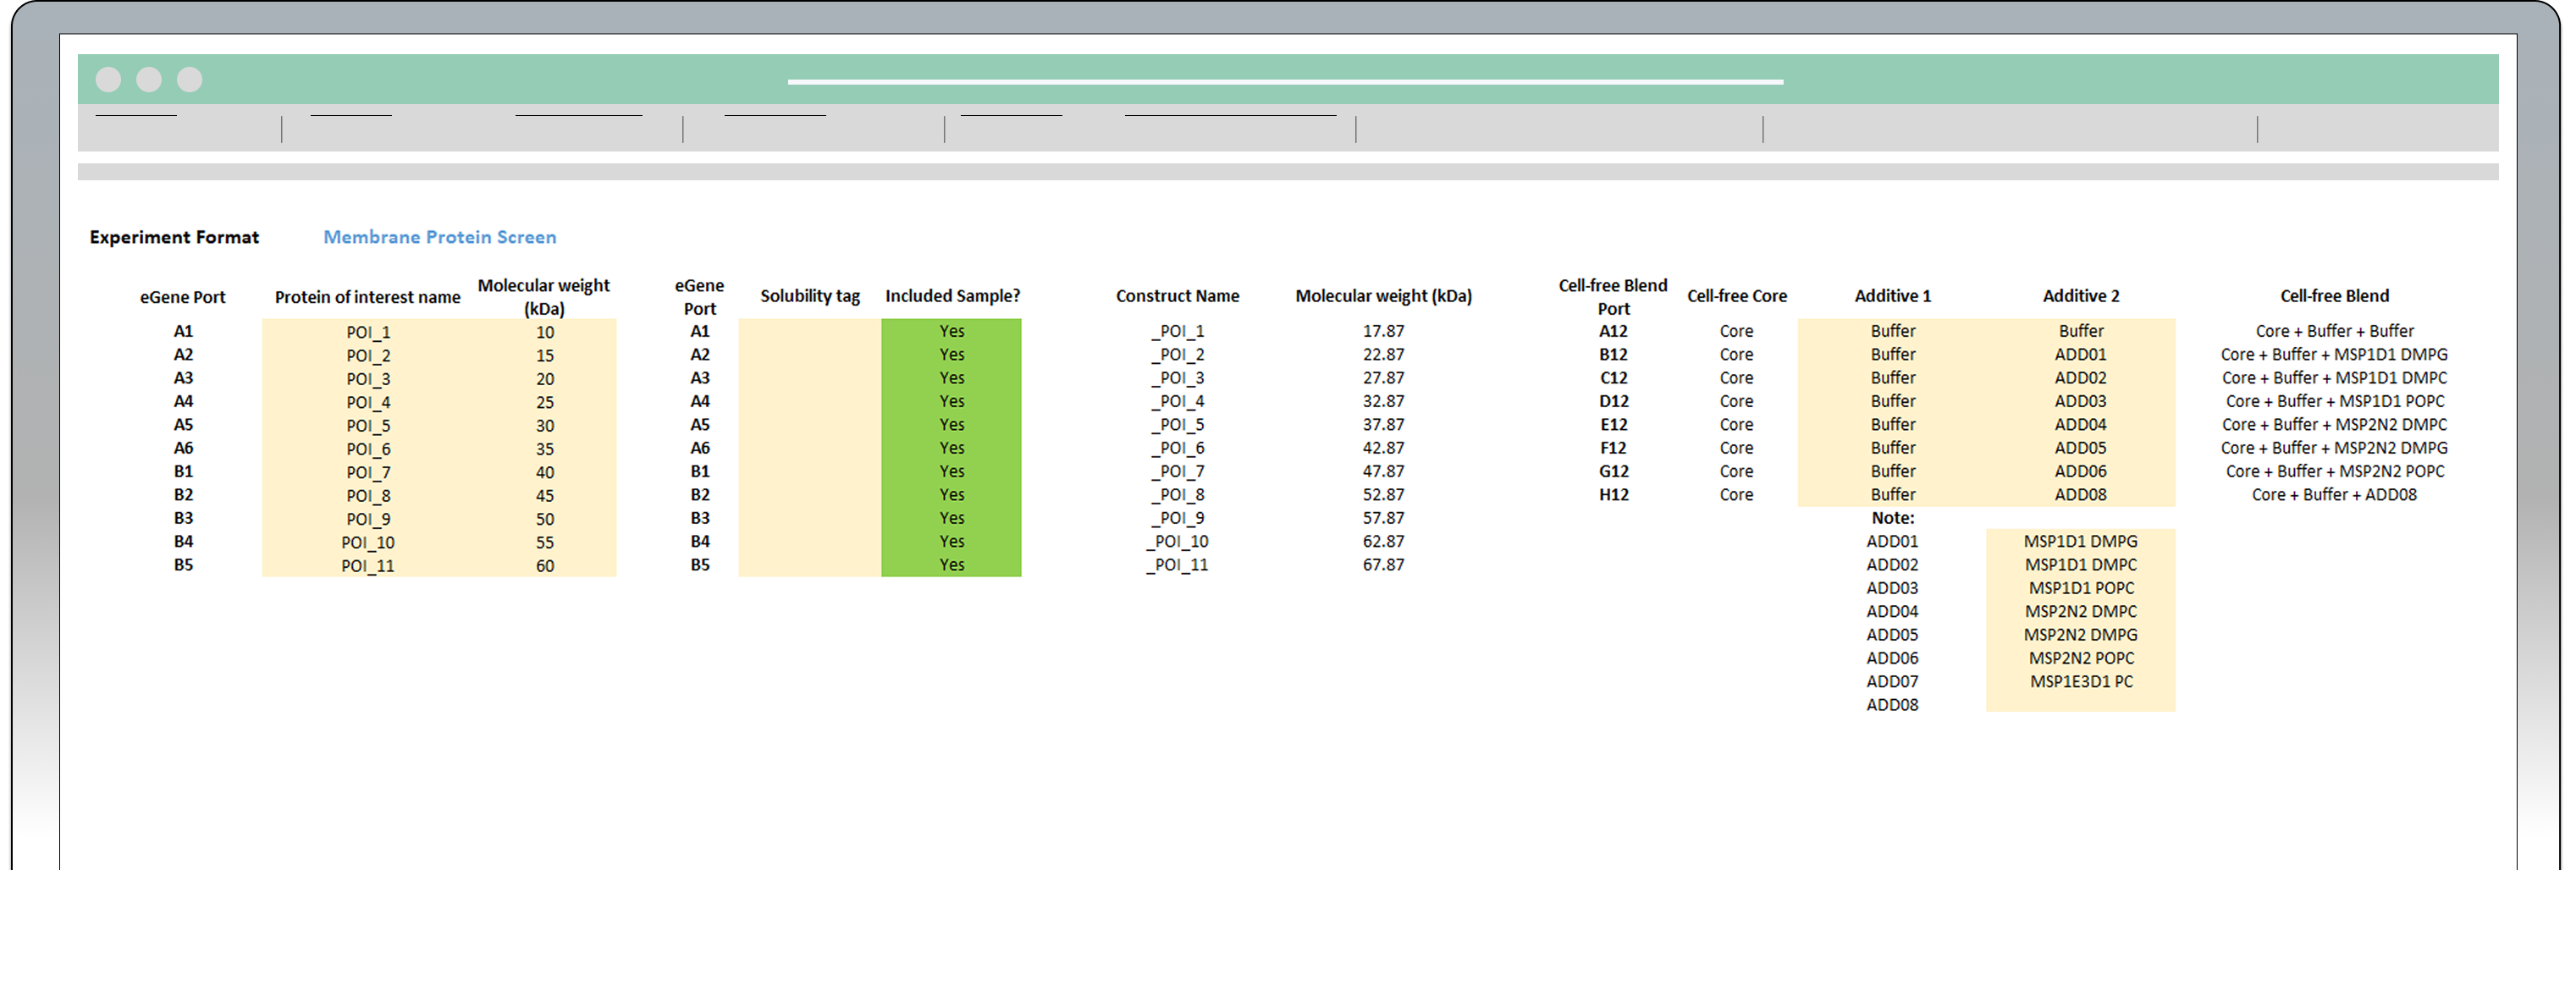
Sheet “1. Enter experiment details” of the eProtein Discovery™ Standalone template.
- Once the five steps outlined above are completed, the white columns for Construct, Molecular weight (KDa), Protein, and Cell-free Blend will be automatically populated with more information.
Example of sheet “1. Enter experiment details” with experiment details entered.
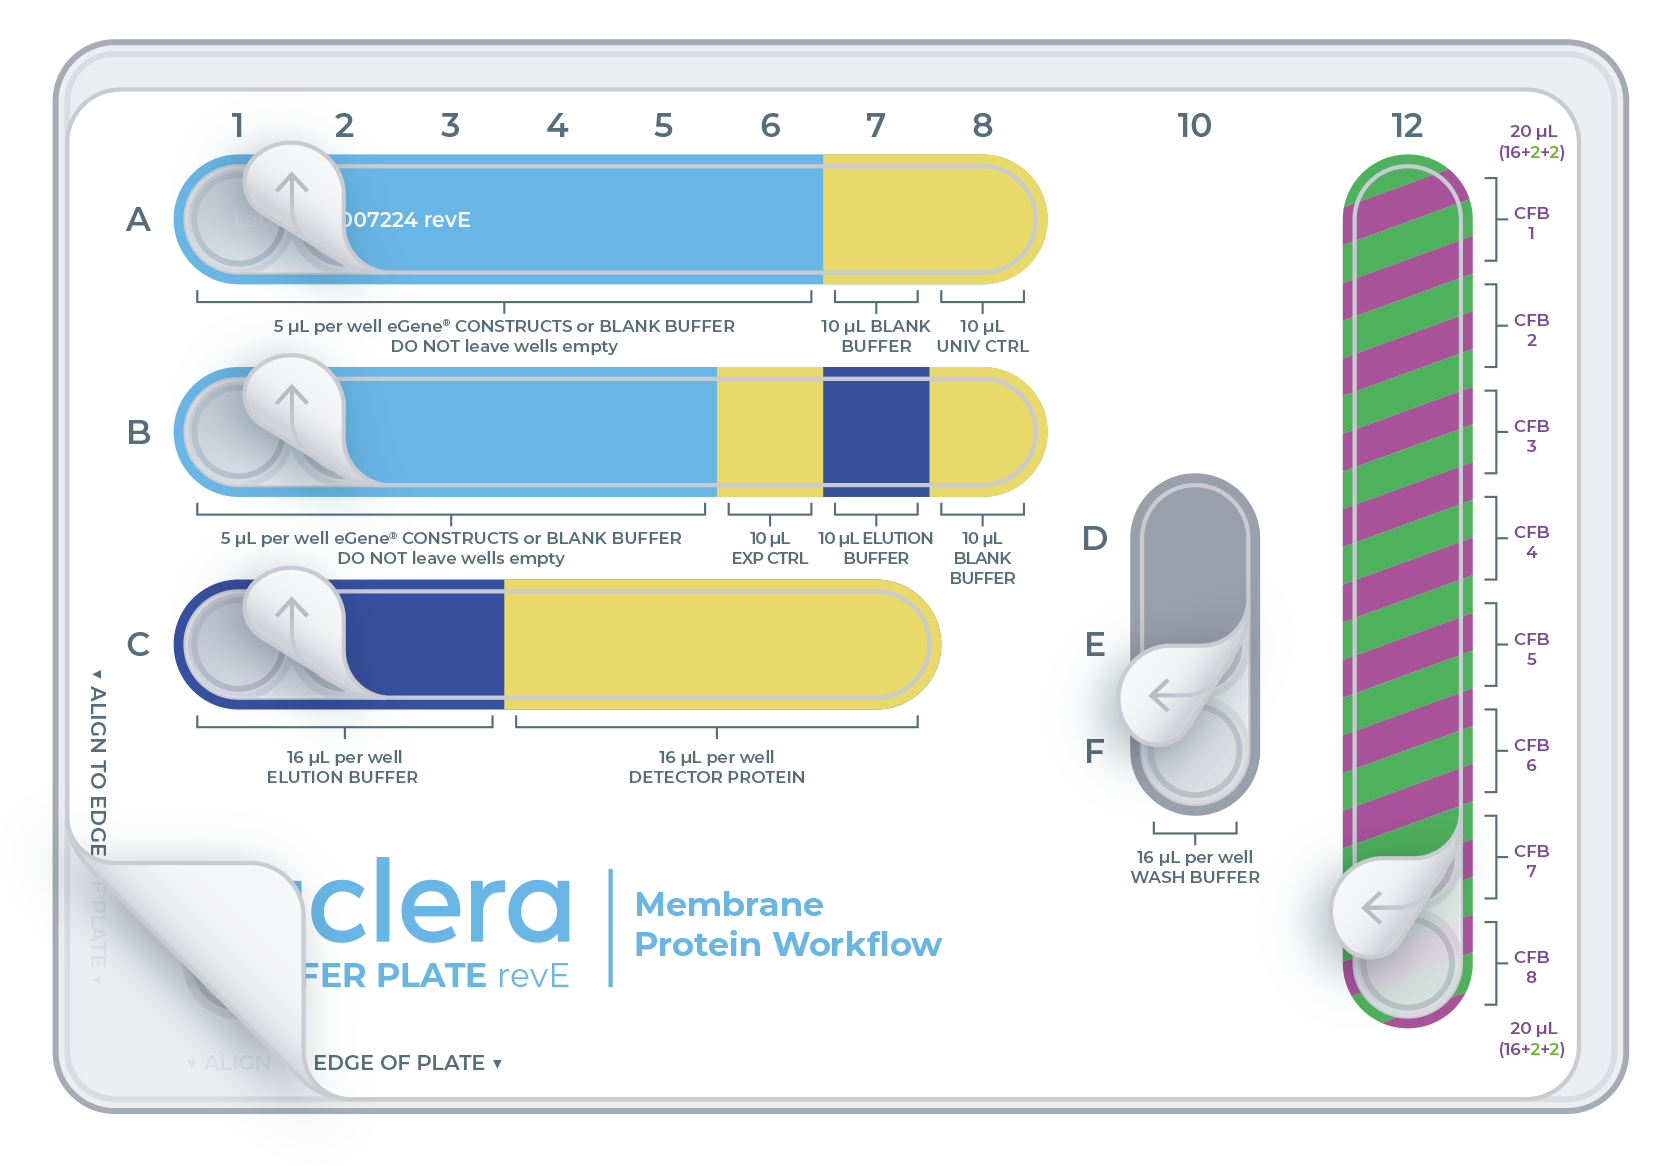
"2. Print plate map" sheet
This sheet is the printable version of the experiment design. It is recommended to print this sheet and take it to the lab as a guide for loading reagents onto the transfer plate.
- On the same sheet, below the table, you can find the transfer plate design. This design will help you determine where to load reagents on the transfer plate.
Connect the vial of base fluid to the pump module
In anticipation of starting a new experiment, take a fresh vial of base fluid, open it, and connect it to the left holder on the eProtein Discovery™ instrument pump module
It is important to equilibrate the base fluid with the lab atmosphere prior to use. This is to prevent outgassing of the base fluid during the run, as air bubbles can interfere with the droplet movement. We recommend attaching the base fluid to the instrument the day before you will perform the run. An acceptable alternative is to incubate the uncapped base fluid at 30°C / 86°F for 1 hour.
Connect the waste container, empty, to the right holder of the pump module
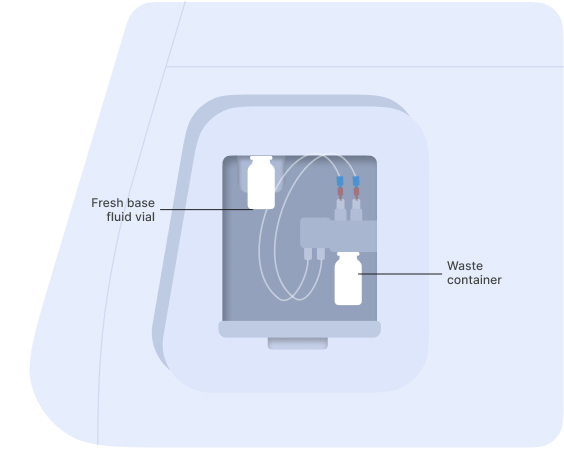
Vial of base fluid and the waste container connected to the pump as shown on the screen
[1]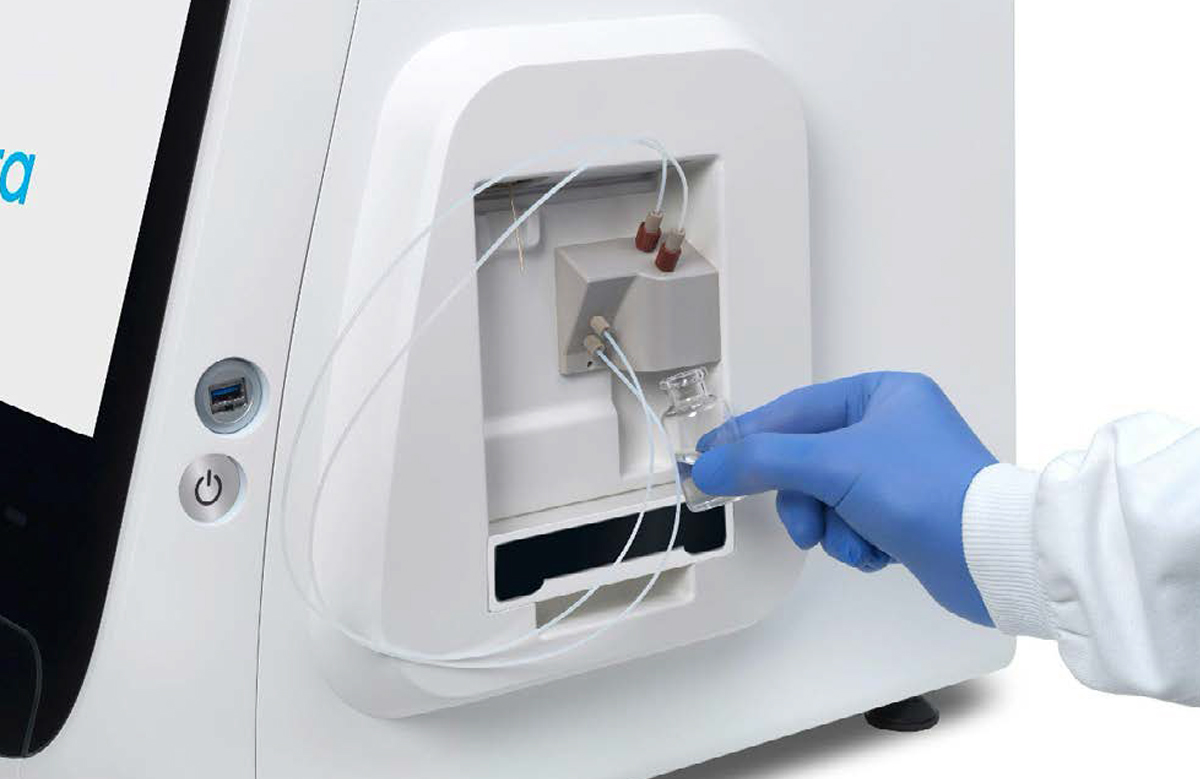 [2]
[2]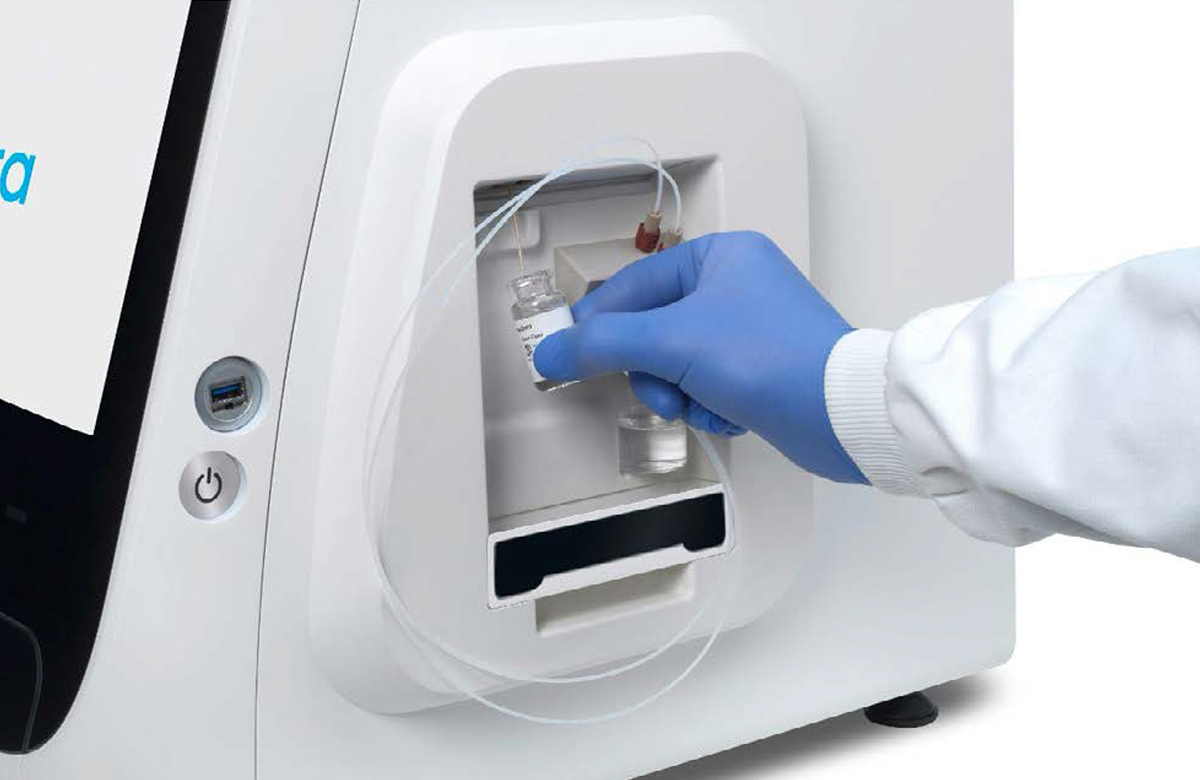
Connection of the empty waste container [1] and the vial of base fluid [2] to the pump
…
Nuclera Technical Support:
UK Phone +44 1223 942 761
US Phone: +1 508-306-1297
Email: techsupport@nuclera.com
Offices:
Nuclera UK (HQ):
One Vision Park, Station Road, Cambridge, CB24 9NP, UK
Nuclera USA: 1000 Technology Park Drive, Suite B, Billerica MA 01821, USA www.nuclera.com
Copyright © 2025 Nuclera Ltd. All trademarks are the property of Nuclera, Ltd. Visit nuclera.com/legal for more info.